Layout & layers
There is no layout engine to configure. Layout is three ideas — pins, stacks and containers — and the Layers list shows how they fit together.
Pins
- An element inside a group can be pinned to it: left, right, top, bottom, centre — or stretched between two edges. Pins decide what happens when the group is resized.
- A caption pinned to the bottom of a card stays at the bottom when the card grows. A banner pinned to both sides stretches with it. A badge pinned to the centre stays centred.
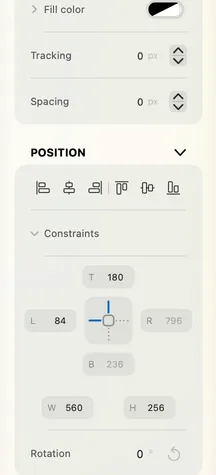
- Constraints, under Position in the inspector, shows the pins as a small widget: tap a side to pin it, pin both sides to stretch, tap the middle to centre. The fields around it are the distances to each edge. On iPhone, Position is in the menu and opens as a sheet.
- Elements placed straight on the page, lines, paths and freeforms have no pins.
Stack
- Select two or more siblings and press ⇧A (or Arrange › Stack). They get a container and share its length equally, in a row or a column — whichever way they were laid out. A grid of them becomes rows inside a column. Resize the container and the slots follow.
- A group with two or more elements can be stacked on its own: select it and press ⇧A. Inside a stack, Position reads Auto — the stack places them.
- ⌥⇧A, or Unstack, frees the elements again and keeps the container.
- Made for rows of icons, buttons and cards. Lines, paths, freeforms and rotated or locked elements can't be stacked.
Align and Tidy Up
- Align: with several elements selected, Arrange in the menu and the Position section of the inspector offer left, centre, right, top, middle and bottom. With one element selected, the same buttons in Position line it up inside its parent.
- Tidy Up, under Arrange, snaps a messy selection into a neat row or grid, using the median gap between them. Sizes are never touched.
- ⌘A with one element of a group selected takes all of its siblings — the setup for Tidy Up or Stack.
Groups and containers
- ⌘G groups a selection into a container, ⇧⌘G ungroups it. Containers clip their children and can carry a fill — colour, gradient or background blur — a stroke, rounded corners, a shadow inside and out, blur and opacity of their own.
- Cards, device frames and freeforms are containers too — on a device frame, Ungroup reads Unframe. Nesting is the whole model, and dragging in and out of containers is how you move things between them: see Selecting & moving.
- Fit in Container stretches an element to its parent's size. Convert to Freeform Group, under Edit, turns a group into a freeform: an outline you edit point by point, with everything still inside it.
Layers
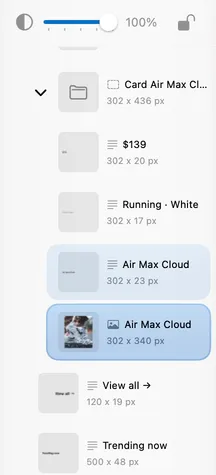
- The Layers tab of the inspector lists everything on the page in stacking order, front at the top, nested exactly like the page. A folded group shows how many elements it holds.
- Tap a row to select its element, however deep; tap it again to let go, ⌘-tap to add or remove one. Pointing at a row highlights its element on the page.
- Drag a row to reorder it; drop it onto a group to nest it there. Hold ⌥ as you drag to duplicate it instead.
- Each row shows a thumbnail, the name, the size and, when it is locked, a padlock. Double-tap a row to rename it; double-tap its thumbnail to zoom to the element. Right-click or long-press it for the same menu as on the page, plus Show in Canvas.
- With one element selected, a bar at the top of the list holds its opacity slider — the circle switches it off and on — and its lock. On the Mac, the Search field at the bottom finds elements by name or by their text.
- Bring to Front and Send to Back (⇧⌘] and ⇧⌘[), Bring Forward and Send Backward change the order from Arrange, without opening the panel.
- On iPhone the list is Elements, on the page-settings page of the bottom bar: tap a row to mark it, then double-tap it or confirm to select it.
A group can also take a custom outline: see Freeform & vectors.