
Start here
Pixara is a native design app for Mac, iPad and iPhone: posters, social posts, presentations, documents, logos and mockups. A document is a stack of pages — an A4 sheet, an Instagram post, a slide, any size you type — and everything on a page can be moved, restyled and animated.
The first five minutes
- Create a document. The create button on Home opens a menu. New Document asks for a size — fifteen presets from Instagram Post to A4, Presentation and Business Card, or any size you type. Photo Album starts from a picture, and so do Camera and Scan Document on iPhone and iPad. Or tap a template: their folders are on Home, in the sidebar on Mac and iPad and as chips on iPhone. On the Mac, Pixara then asks where to save the file, like Pages.
- Tap to select. The first tap picks the element on the page under your finger — the whole card or group. The next tap goes straight to what is under it, however deep. Double-tap a text and you are editing it. Long-press empty space and drag to select several.
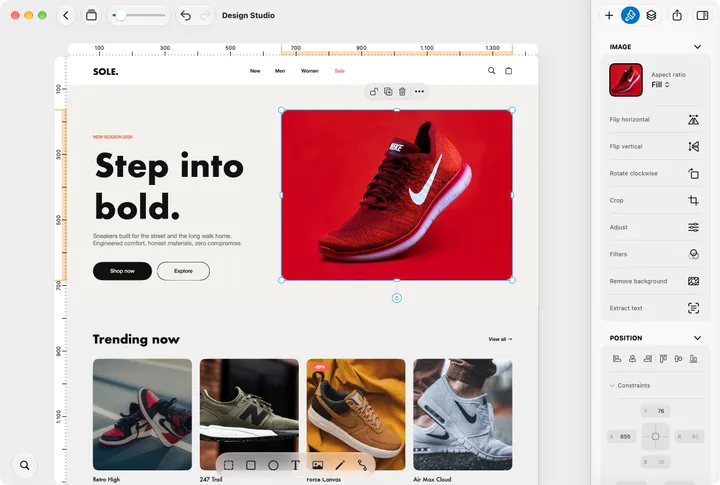
- Add something. The basics — group, rectangle, circle, text, image, drawing, path — sit in the creation bar at the bottom of the screen; on iPhone they are the first page of the bottom bar. Everything else is in Elements — the + tab of the inspector on Mac and iPad (⌘I), + Insert on iPhone. Faster, on Mac and iPad: Quick search, the bubble in the bottom-left corner (⌘F). Type "star", tap the match.
- Look around. Pinch to zoom and drag empty space to pan; on the Mac, scroll, and ⌥ scroll zooms with a mouse. A document always opens fitted to its page, and ⌥⌘0 fits it again.
- Add pages. The pages panel — on the left on Mac and iPad (⇧⌘1), a strip above the bottom bar on iPhone — adds a page with its add tile (⇧⌘N), and duplicates, deletes and exports pages from their menu.
- Never save. Documents save themselves as you work, and the ones in iCloud Drive sync to your other devices. Undo keeps your last two hundred steps while the document is open — ⌘Z, or the arrow in the toolbar.
The cheat sheet
Same ideas, three devices. If you remember one table, make it this one.
| Action | Mac | iPad | iPhone |
|---|---|---|---|
| Select | Click | Tap | Tap |
| Reach what's inside | Click it again | Tap it again | Tap it again |
| Go up a level | Double-click | Double-tap | Double-tap |
| Select several | Drag on empty space · ⌘-click adds or removes one | Long-press empty space, then drag · with a trackpad, just drag | Long-press empty space, then drag |
| Move | Drag — no need to select first | Select, then drag · with a trackpad, just drag | Select, then drag |
| Duplicate | ⌘ D ⌥ drag | The small toolbar · ⌥ drag with a keyboard | The small toolbar |
| More actions | Right-click | Long-press and hold · right-click with a trackpad | Long-press and hold |
| Edit text | Return, or double-click the text | Double-tap the text | Double-tap the text |
| Pan | Scroll | Drag empty space | Drag empty space |
| Zoom | ⌘ = ⌘ − ⌘ 0 ⌥ ⌘ 0 | Pinch | Pinch |
| Add a page | ⇧ ⌘ N | The add tile in the pages panel | The add tile in the pages strip |
| Deselect | Esc, or click empty space | Tap empty space | Tap empty space, or ✕ |
| Undo | ⌘ Z | ⌘ Z toolbar | Toolbar arrow |
| Redo | ⇧ ⌘ Z | ⇧ ⌘ Z toolbar | Toolbar arrow |
| Present | ⌥ ⌘ P Share › Present | Share › Present | Share › Present |
Where things live
Mac
Pages on the left (⇧⌘1), the inspector on the right (⇧⌘2) with Elements, Design and Layers tabs. The creation bar at the bottom, Quick search bottom-left. Menus and shortcuts for everything else; the chevron goes back to Home.
iPad
Top bar: back, pages, undo, redo, Share, and the inspector tabs — Elements, Design, Layers. In landscape the inspector opens by itself. Apple Pencil draws; a trackpad behaves like the Mac.
iPhone
Top bar: back, ✕ while something is selected, undo, redo, Share. The bar at the bottom holds + Insert, the creation tools, the page settings and the selection's properties; the pages strip sits just above it.
The rest of this guide
- Selecting & moving
- Elements
- Layout & layers
- Pages
- Present & animate
- iPhone, iPad & Mac
- Templates & import
- AI
- Freeform & vectors
- Export, Recents & sync
- Shortcuts, tips & Pro
Still stuck? Settings › Chat with us — Help › Chat with Support… on the Mac — is a conversation with the people who build Pixara. Or get in touch from the website.